Comming Soon.....
Android Floating Action Button (FAB) for based on Material Design
Floating action buttons (or FAB) are: “A special case of promoted actions. They are distinguished by a circled icon floating above the UI and have special motion behaviors, related to morphing, launching, and its transferring anchor point.”
FAB is not compulsory to add FAB to your app if you want to avoid the FAB you are free to do that as well and for your Floating Action Button (FAB) the actual drawable size should be 24dp.
Design Support Library
You should now be able to add the android.support.design.widget.FloatingActionButton view to the layout. The src attribute references the icon that should be used for the floating action.
open Gradle Scripts-> build.gradle
dependencies {
'compile 'com.android.support:design:23.0.1'
}
Source Code
FloatingActionButton
Exp:-
<android.support.design.widget.FloatingActionButton
android:layout_alignParentBottom="true"
android:id="@+id/fab"
android:layout_width="wrap_content"
android:layout_height="wrap_content"
android:layout_gravity="bottom|right"
android:layout_marginBottom="30dp"
android:layout_marginLeft="20dp"
android:src="@android:drawable/ic_dialog_info" />
Screen Shot Example :-

Color palette For Android material Design
http://goo.gl/Vb0QcQ
Now lets start Floating Action Button Based on Material Design Step By step
1.first create Material Theme.
res-> styles.xml
<style name="flotingMaterialTheme" parent="MyMaterialTheme.Base">
</style>
<style name="MyMaterialTheme.Base" parent="Theme.AppCompat.Light.DarkActionBar">
<item name="windowNoTitle">true</item>
<item name="windowActionBar">false</item>
<item name="colorPrimary">@color/colorPrimary</item>
<item name="colorPrimaryDark">@color/colorPrimaryDark</item>
<item name="colorAccent">@color/colorAccent</item>
</style>
2.Add Color For material design. res-> colors.xml
<color name="colorPrimary">#00BCD4</color>
<color name="colorPrimaryDark">#00838F</color>
<color name="textColorPrimary">#FFFFFF</color>
<color name="windowBackground">#FFFFFF</color>
<color name="navigationBarColor">#000000</color>
3.Add Material Theme in Your Manifests.xml
<?xml version="1.0" encoding="utf-8"?>
<manifest xmlns:android="http://schemas.android.com/apk/res/android"
package="demo.androidpoint.com.floatinglabelsedittext">
<application
android:allowBackup="true"
android:icon="@mipmap/ic_launcher"
android:label="@string/app_name"
android:theme="@style/flotingMaterialTheme">
<activity
android:name=".MainActivity"
android:label="@string/app_name" >
<intent-filter>
<action
android:name="android.intent.action.MAIN"/>
<category
android:name="android.intent.category.LAUNCHER" />
</intent-filter>
</activity>
</application>
</manifest>
4.Create toolbar layout.
create toolbar xml seperate file for all screen layout.res->layout->toolbar.xml
Ex.
<?xml version="1.0" encoding="utf-8"?>
<android.support.v7.widget.Toolbar xmlns:android="http://schemas.android.com/apk/res/android"
xmlns:local="http://schemas.android.com/apk/res-auto"
android:id="@+id/toolbar"
android:layout_width="match_parent"
android:layout_height="wrap_content"
android:minHeight="?attr/actionBarSize"
android:background="?attr/colorPrimary"
local:theme="@style/ThemeOverlay.AppCompat.Dark.ActionBar"
local:popupTheme="@style/ThemeOverlay.AppCompat.Light" />
5.Add Toolbar in Your layout.
add toolbar on your layout whenever you want by the user of include tage.
Ex.
<include
android:id="@+id/toolbar"layout="@layout/toolbar" />
6. Add Floating action buttons On Your Xml Layout.
res->layout=>activity_main.xml
<android.support.design.widget.FloatingActionButton
android:layout_alignParentBottom="true"
android:id="@+id/fab"
android:layout_width="wrap_content"
android:layout_height="wrap_content"
android:layout_gravity="bottom|right"
android:layout_marginBottom="30dp"
android:layout_marginLeft="20dp"
android:src="@android:drawable/ic_dialog_info" />
7. Add Floating action buttons On Your Xml Layout.
java->Your Package_>MainActivity.java
insert this code inside onCrete method
FloatingActionButton fab = (FloatingActionButton) findViewById(R.id.fab);
fab.setOnClickListener(new View.OnClickListener() {
@Override
public void onClick(View view) {
Snackbar.make(view, "Replace your meassge here...", Snackbar.LENGTH_LONG).setAction("Action", null).show();
}
});
8. Output after click on Floating action buttons
after click on Floating button open Snackbars will be open

9. For more information
http://goo.gl/aQmE0L
and other material design example
goo.gl/JlnYFY
http://goo.gl/0XPYWJ
Android Material Design Floating Labels for EditText Step by Step
May 29, 2015 this functionality is now provided in the Android Design Support Library
EditText will hide the hint text after the first character is typed.you can now wrap it in a TextInputLayout, causing the hint text to become a floating label above the EditText, ensuring that users never lose context in what they are entering.
You can also set an error message to EditText by using setErrorEnabled() and setError() methods.
Source Code
Your screen look like this :-
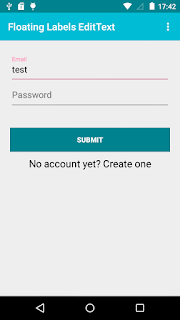
Note:
Android floating label EditText is shown through the new design support library, first lets include it in the gradle file of our project:
open Gradle Scripts-> build.gradle
compile 'com.android.support:design:23.0.1'
For Eclipse, you can find the Design Support Library project under sdk/extras/android/support/design.
This library includes support for
Floating labels
Floating action button
Snackbar
Navigation drawer
and more
TextInputLayout is use for floating label on EditText
Ex:-
<android.support.design.widget.TextInputLayout
android:id="@+id/input_layout_password"
android:layout_width="match_parent"
android:layout_height="wrap_content">
<EditText
android:id="@+id/input_password"
android:layout_width="match_parent"
android:layout_height="wrap_content"
android:inputType="textPassword"
android:hint="@string/hint_pass" />
</android.support.design.widget.TextInputLayout>
<style name="flotingMaterialTheme" parent="MyMaterialTheme.Base">
EditText will hide the hint text after the first character is typed.you can now wrap it in a TextInputLayout, causing the hint text to become a floating label above the EditText, ensuring that users never lose context in what they are entering.
You can also set an error message to EditText by using setErrorEnabled() and setError() methods.
Source Code
Your screen look like this :-

Note:
Android floating label EditText is shown through the new design support library, first lets include it in the gradle file of our project:
open Gradle Scripts-> build.gradle
compile 'com.android.support:design:23.0.1'
For Eclipse, you can find the Design Support Library project under sdk/extras/android/support/design.
This library includes support for
Floating labels
Floating action button
Snackbar
Navigation drawer
and more
TextInputLayout is use for floating label on EditText
Ex:-
<android.support.design.widget.TextInputLayout
android:id="@+id/input_layout_password"
android:layout_width="match_parent"
android:layout_height="wrap_content">
<EditText
android:id="@+id/input_password"
android:layout_width="match_parent"
android:layout_height="wrap_content"
android:inputType="textPassword"
android:hint="@string/hint_pass" />
</android.support.design.widget.TextInputLayout>
Now we learn about android material design floating labels foredittext Step by step
1.Create MaterialTheme. res-> styles.xml
</style> <style name="MyMaterialTheme.Base" parent="Theme.AppCompat.Light.DarkActionBar"> <item name="windowNoTitle">true</item> <item name="windowActionBar">false</item> <item name="colorPrimary">@color/colorPrimary</item> <item name="colorPrimaryDark">@color/colorPrimaryDark</item> <item name="colorAccent">@color/colorAccent</item> </style>2.Add Color For material design. res-> colors.xml<color name="colorPrimary">#00BCD4</color><color name="colorPrimaryDark">#00838F</color> <color name="textColorPrimary">#FFFFFF</color> <color name="windowBackground">#FFFFFF</color> <color name="navigationBarColor">#000000</color>3.Add Material Theme in Your Manifests.xml.<?xml version="1.0" encoding="utf-8"?><manifest xmlns:android="http://schemas.android.com/apk/res/android" package="demo.androidpoint.com.floatinglabelsedittext"> <application android:allowBackup="true" android:icon="@mipmap/ic_launcher" android:label="@string/app_name" android:theme="@style/flotingMaterialTheme"> <activity android:name=".MainActivity" android:label="@string/app_name" > <intent-filter> <action android:name="android.intent.action.MAIN"/> <category android:name="android.intent.category.LAUNCHER" /> </intent-filter> </activity> </application> </manifest>4.Create toolbar xml for header. res->layout->toolbar.xml<?xml version="1.0" encoding="utf-8"?><android.support.v7.widget.Toolbar xmlns:android="http://schemas.android.com/apk/res/android" xmlns:local="http://schemas.android.com/apk/res-auto" android:id="@+id/toolbar" android:layout_width="match_parent" android:layout_height="wrap_content" android:minHeight="?attr/actionBarSize" android:background="?attr/colorPrimary" local:theme="@style/ThemeOverlay.AppCompat.Dark.ActionBar" local:popupTheme="@style/ThemeOverlay.AppCompat.Light"/>5.Create layout xml For floating label EditText.res->layout->main_layout.xml<RelativeLayou txmlns:android="http://schemas.android.com/apk/res/android" xmlns:tools="http://schemas.android.com/tools" android:layout_width="match_parent" android:layout_height="match_parent" android:paddingBottom="@dimen/activity_vertical_margin" tools:context=".MainActivity"> <LinearLayout android:layout_width="match_parent" android:layout_height="match_parent" android:orientation="vertical"> <LinearLayout android:id="@+id/container_toolbar" android:layout_width="match_parent" android:layout_height="wrap_content" android:orientation="vertical"> <include android:id="@+id/toolbar" layout="@layout/toolbar" /> </LinearLayout> </LinearLayout> <LinearLayout android:visibility="visible" android:layout_width="fill_parent" android:layout_height="match_parent" android:layout_marginTop="?attr/actionBarSize" android:orientation="vertical" android:paddingLeft="20dp" android:paddingRight="20dp" > <android.support.design.widget.TextInputLayout android:id="@+id/input_layout_email" android:layout_width="match_parent" android:layout_marginTop="30dp" android:layout_height="wrap_content"> <EditText android:id="@+id/input_email" android:layout_width="match_parent" android:layout_height="wrap_content" android:inputType="textEmailAddress" android:hint="@string/hint_email" /> </android.support.design.widget.TextInputLayout> <android.support.design.widget.TextInputLayout android:id="@+id/input_layout_password" android:layout_width="match_parent" android:layout_height="wrap_content"> <EditText android:id="@+id/input_password" android:layout_width="match_parent" android:layout_height="wrap_content" android:inputType="textPassword" android:hint="@string/hint_pass" /> </android.support.design.widget.TextInputLayout> <Button android:id="@+id/btn_signup" android:layout_width="fill_parent" android:layout_height="wrap_content" android:text="@string/btn_sunmit" android:background="@color/colorPrimaryDark" android:layout_marginTop="40dp" android:textStyle="bold" android:textColor="@android:color/white"/> <TextView android:id="@+id/txt_newaccount" android:layout_marginTop="10dp" android:textSize="20dp" android:textColor="@android:color/black" android:gravity="center" android:text="No account yet? Create one" android:layout_width="match_parent" android:layout_height="wrap_content" /> </LinearLayout> </RelativeLayout>6.Here create Activity classjava->Your Package_>MainActivity.javapackage demo.androidpoint.com.floatinglabelsedittext; import android.app.Activity; import android.os.Bundle; import android.support.v7.app.AppCompatActivity; import android.view.Menu; import android.view.MenuItem; public class MainActivity extends AppCompatActivity { private android.support.v7.widget.Toolbar toolbar; @Override protected void onCreate(Bundle savedInstanceState) { super.onCreate(savedInstanceState); setContentView(R.layout.activity_main); toolbar = (android.support.v7.widget.Toolbar) findViewById(R.id.toolbar); setSupportActionBar(toolbar); getSupportActionBar().setDisplayShowHomeEnabled(true); getSupportActionBar().setTitle("Floating Labels EditText"); } @Override public boolean onCreateOptionsMenu(Menu menu) { getMenuInflater().inflate(R.menu.menu_main, menu); return true; } @Override public boolean onOptionsItemSelected(MenuItem item) { int id = item.getItemId(); if (id == R.id.action_settings) { return true; } return super.onOptionsItemSelected(item); } }Source Code


