Android Basic UI Controls


This is a most important part for beginner. In this tutorial we will learn about most useful UI Controls of Android.

1. Layouts

1.1 LinearLayout:

LinearLayout is a parent view(View Group) for use to aligns all child view in a single direction such as  vertically or horizontally for more detail click .

1.2 RelativeLayout

RelativeLayout is same as LinearLayout  that displays child views in relative positions for more detail click.

1.3 TableLayout

TableLayout is also parent  view that child views into  rows and columns for more detail click.

1.4 FrameLayout

FrameLayout is Container view that use for display only single view for more detail click

2. UI Controls

2.1 TextView

this control use for display any text.

2.2 Button

this use for perform event(task) on button click,for know more about Button click.

2.3 ImageButton

this same as Button with Image

2.4 CheckBox

this is use for select multiple options for user, click for more detail. 

2.5 EditText

this is use for Enter any text form user.its subclass of TextView, its have editing capability.more information click .

2.6 TimePicker

this is use for select time of day, more click.

2.7 DatePicker

its use for select date,click for more information 

2.8 RadioButton

its use for choose one from multiple options by user, click for detail.  

2.9 RadioGroup

its use for group RadioButton,click. 

3. UI List 

3.1 ListView

ListView is use to  displays a list by the use of adapter, its scroll by-default.
  

3.2 GridView

GridView is use for display a list in multiple columns.its also use by Adapter.   


4.Other UI Widgets

4.1 Spinner

this is a view for use select one option from multiple. its drop down list.  

4.2 AutoCompleteTextView

this is use for get text from user like EditText and its suggest to user when user type any text.

4.3 RatingBar

this is use for display rating

4.4 ProgressBar

this is use for display progress  

4.5 ToggleButton

this is use for two options in a single view. 

4.6 Toast

this is use for short massage for user.


Introduce of Android and Installation of Android Studio?

1. What is android?

One of the most widely used mobile OS these days is ANDROID. Android is not only operating system but also middleware and key applications. Android Inc was founded in Palo Alto of California, U.S. by Andy Rubin, Rich miner, Nick sears and Chris White in 2003. Later Android Inc. was acquired by Google in 2005. After original release there have been number of updates in the original version of Android.

2. Overview

Android is a Linux-based operating system,native mobile application along with set of api libraries for building third party applications .It is one of the most widely used OS. Android has a large community for developing their own applications, written primarily on customized Java Programming language. Anyone with basic knowledge in java can start developing Android applications. Android OS version varies from 1.0 to 6.0 Marshmallow. Notice carefully you can see all the OS names are desserts, but still the naming reason is not released by Google and the names are alphabetically.

3.Android Version History?

There are some Version History of Android blow

1.Alfa
Android 1.1

2.Beta
Android 1.2

3.Cupcake
Android 1.5

4.Donut:
Android 1.6

5.Eclair:
Android 2.0
Android 2.1

6.Froyo: (short for "frozen yogurt")
Android 2.2

7.Gingerbread:
Android 2.3

8.Honeycomb:
Android 3.0
Android 3.1
Android 3.2

9.Ice Cream Sandwich:
Android 4.0

10.Jelly Bean:
Android 4.1
Android 4.2
Android 4.3

11.KitKat:
Android 4.4

12.Lollipop:
Android 5.0
Android 5.1

13.Marshmallow:
Android 6.0
Android 6.0.1

14.Nougat 
Android 7.0

4. There are three big things that you need to start Android development

 4.1   Basic Java programming

 4.2  XML

 4.3 Experience with widget-based UI models


5. Please follow blow process for start android app development?

5.1 Install Java in your System.

First you have to install JAVA in your system according to your system configuration.i am providing you a official link to install JAVA in your system.
you can real all think about JAVA  click on  blow link.   

5.2 Download and install Android Studio and SDK.

If till now you did not install Android Studio in your system please click to blow link and follow the all process.
Android Studio available only  for three OS
1. Window System.
2. Linux System
3. Mac System
Note : - The OS Selecting Options is right side on the window for blow link
This is officail link for install android studio

5.3 Create and Manage Virtual Devices?

After Successfully installed  Android Studio in tour system,the next this you have to test your application with android studio, The android SDK also provide a Virtual Devices for Testing android application
i am proving you a link for guiding you to create Virtual Device in android Studio 

Thank You?

Basic Java programming

1. Basic Overview about Java Platform

Java is a Object oriented programming language which was introduced Sun Microsystems  in1992 .
java characteristics are -Simple, Object oriented , Secure, Portable, Multi threaded, Dynamic, Robust etc.

2. Language fundamentals (flow control, etc.)


The recommended system configuration is:

A system supporting Java SE 8 with at least 2GB of memory. Java 8 is supported on Linux®,Windows®, Solaris®, and Mac OS X.
At least 200MB of disk space to install the software components and examples.

JDK And JRE

Oracle provides two principal software products in the Java™ Platform, Standard Edition (Java™ SE) family:
Java SE Runtime Environment (JRE)

The JRE provides the libraries, Java virtual machine, and other components necessary for you to run applets and applications written in the Java programming language. This runtime environment can be redistributed with applications to make them free-standing.

The JDK includes the JRE plus command-line development tools such as compilers and debuggers that are necessary or useful for developing applets and applications.

Java Virtual Machine(JVM)

The Java virtual machine is an abstract computing machine that has an instruction set and manipulates memory at run time. The Java virtual machine is ported to different platforms to provide hardware- and operating system-independence.

Flow Controll of java

The statements inside your source files are generally executed from top to bottom, in the order that they appear. Control flow statements, however, break up the flow of execution by employing decision making, looping, and branching, enabling your program to conditionally execute particular blocks of code. This section describes the decision-making statements (if-then, if-then-else, switch), the looping statements (for, while, do-while), and the branching statements (break, continue, return) supported by the Java programming language
For more information to install java click


3.There are some few topic for learn java 

i am proving you all basic knowledge which is use for android development so before starting to learn android development you have to prepare following topic that will help to learn android 

click the following topic to get full details about them..

    Oops Concept

      Modifier  Public, private, protected and Default

        Exceptions

          Threads

            Collections

              Interfaces


              Thanks You.


              Android Material Design Custom List with CardView and RecyclerView

              Android lollipop 5.0 introduced two new widgets RecuclerView and CardView. The RecyclerView is a updated version of ListView. And other new component CardView is use for rounded corner or shadow and its use for a single row for ListView or GridView.
              RecuclerView is also use for both direction Vertical or Horizontal
              Ccreen View something like this after using  RecuclerView and CardView.     
                                                                                       
                                             
              In this tutorial we learn about how to implements RecycleView or CardView for creating custom list.
              whenever you want to use this two component please follow the step below.

              note :
              Now we have to replace AppCompatActivity  to Activity
              add supported library in your Gradle Scripts


              dependencies {
                  compile fileTree(dir: 'libs', include: ['*.jar'])
                  compile 'com.android.support:recyclerview-v7:23.+'
                  compile 'com.android.support:cardview-v7:23.+'
                  compile 'com.android.support:design:23.0.0'
                  compile 'com.android.support:appcompat-v7:23.0.0'
              }

              1. How to create Material Design Theme and add Toolbar click on below link  

              2.Create Project
              first create a project in android studio with Activity name as MainActivity.java Class and layout name as activity_main.xml.
              2.1 Create activity_main.xml in app-> res-> layout.

              <LinearLayout 
                  xmlns:android="http://schemas.android.com/apk/res/android"
                  xmlns:tools="http://schemas.android.com/tools" android:layout_width="match_parent"
                  android:layout_height="match_parent"
                  android:orientation="vertical"
                  tools:context=".MainActivity">
                      <LinearLayout
                          android:id="@+id/container_toolbar"
                          android:layout_width="match_parent"
                          android:layout_height="wrap_content"
                          android:orientation="vertical">
                            <include
                               android:id="@+id/toolbar"
                              layout="@layout/toolbar" />
                      </LinearLayout>
                  <android.support.v7.widget.RecyclerView
                      android:id="@+id/list"
                      android:layout_width="match_parent"
                      android:layout_height="match_parent"
                      tools:context=".CountryActivity"
                      />
              </LinearLayout>

              2.2 Create Activity MainActivity.java in app-> java-> your package name

              package demo.androidpoint.com.androidcostomlist;
              import android.app.Activity;
              import android.os.Bundle;
              import android.support.v7.app.AppCompatActivity;
              import android.support.v7.widget.DefaultItemAnimator;
              import android.support.v7.widget.LinearLayoutManager;
              import android.support.v7.widget.RecyclerView;
              import android.support.v7.widget.Toolbar;
              import android.view.Menu;
              import android.view.MenuItem;
              import java.util.ArrayList;
              import demo.androidpoint.com.androidcostomlist.modal.item;

              public class MainActivity extends AppCompatActivity{
                  RecyclerView mRecyclerView;
                  CustomAdaptor mAdapter;
                  ArrayList<item> list;
                  private Toolbar mToolbar;

                  @Override
                  protected void onCreate(Bundle savedInstanceState) {
                      super.onCreate(savedInstanceState);
                      setContentView(R.layout.activity_main);
                      mRecyclerView = (RecyclerView)findViewById(R.id.list);
                      mRecyclerView.setLayoutManager(new LinearLayoutManager(this));
                      mRecyclerView.setItemAnimator(new DefaultItemAnimator());

                      mToolbar = (Toolbar) findViewById(R.id.toolbar);
                      setSupportActionBar(mToolbar);

              /*click on Home button enable and set title for this Activity*/
                      getSupportActionBar().setDisplayShowHomeEnabled(true);
                     getSupportActionBar().setTitle("Material Design CardView");

              /*initialised list for costom list and add data*/
                      list = new ArrayList<item>();
                      list.add(new item("Manish Rajput","manish@gmail.com",R.drawable.a1));
                      list.add(new item("Vinit yadav","vinit@gmail.com",R.drawable.a2));
                      list.add(new item("Anoop","anoop@gmail.com",R.drawable.a3));
                      list.add(new item("Dheeraj","Dheeraj@gmail.com",R.drawable.a5));
                      list.add(new item("Ramu","Ramu@gmail.com",R.drawable.a6));
                      list.add(new item("Pankaj","manish@gmail.com",R.drawable.a8));
                      list.add(new item("Ketan","Ketan@gmail.com",R.drawable.a9));
                      list.add(new item("Akshay","Akshay@gmail.com",R.drawable.a10));

              /*initialised Adapter Class and set Adapter on ListView */
                      mAdapter = new CustomAdaptor(list, R.layout.adaptor_item, this);
                      mRecyclerView.setAdapter(mAdapter);
                  }
              /*create options Menu on your Activity*/
                  @Override
                  public boolean onCreateOptionsMenu(Menu menu) {
                      // Inflate the menu; this adds items to the action bar if it is present.
                      getMenuInflater().inflate(R.menu.menu_main, menu);
                      return true;
                  }
                  @Override
                  public boolean onOptionsItemSelected(MenuItem item) {
                      // Handle action bar item clicks here. The action bar will
                      // automatically handle clicks on the Home/Up button, so long
                      // as you specify a parent activity in AndroidManifest.xml.
                      int id = item.getItemId();

                      //noinspection SimplifiableIfStatement
                      if (id == R.id.action_settings) {
                          return true;
                      }
                      return super.onOptionsItemSelected(item);
                  }
              }

              3. Create Custom Adapter  
              app-> java-> your package name

              package demo.androidpoint.com.androidcostomlist;
              import android.content.Context;
              import android.support.v7.widget.RecyclerView;
              import android.view.LayoutInflater;
              import android.view.View;
              import android.view.ViewGroup;
              import android.widget.ImageView;
              import android.widget.TextView;
              import java.util.List;
              import demo.androidpoint.com.androidcostomlist.modal.item;

              public class CustomAdaptor extends RecyclerView.Adapter<CustomAdaptor.ViewHolder> {
                  private List<item> countries;
                  private int rowLayout;
                  private Context mContext;
                  public CustomAdaptor(List<item> countries, int rowLayout, Context context) {
                      this.countries = countries;
                      this.rowLayout = rowLayout;
                      this.mContext = context;
                  }
                  @Override
                  public int getItemCount() {
                      return countries == null ? 0 : countries.size();
                  }
                  @Override
                  public ViewHolder onCreateViewHolder(ViewGroup viewGroup, int i) {
                      View v = LayoutInflater.from(viewGroup.getContext()).inflate(rowLayout, viewGroup, false);
                      return new ViewHolder(v);
                  }
                  @Override
                  public void onBindViewHolder(ViewHolder viewHolder, int i) {
                      item myItem = countries.get(i);
                      viewHolder.Name.setText(myItem.getName());
                      viewHolder.Image.setImageDrawable(mContext.getDrawable(myItem.getOmg()));
                      viewHolder.email.setText(myItem.getEmail());
                  }
                  public static class ViewHolder extends RecyclerView.ViewHolder {
                      public TextView Name,email;
                      public ImageView Image;

                      public ViewHolder(View itemView) {

                          super(itemView);
                          Name = (TextView) itemView.findViewById(R.id.text_name);
                          Image = (ImageView)itemView.findViewById(R.id.Image);
                          email = (TextView) itemView.findViewById(R.id.text_email);
                      }
                }}

              4.create Item View for Adapter app-> res-> layout-> adaptor_item.xml.


              <?xml version="1.0" encoding="utf-8"?>
              <LinearLayout xmlns:android="http://schemas.android.com/apk/res/android"
                  xmlns:card_view="http://schemas.android.com/apk/res-auto"
                  android:layout_width="match_parent"
                 android:layout_height="match_parent">

                  <!-- A CardView that contains a TextView -->
                  <android.support.v7.widget.CardView
                      android:id="@+id/card_view"
                      android:layout_gravity="center"
                      android:layout_width="fill_parent"
                      android:layout_height="wrap_content"
                      android:layout_margin="15dp"
                      card_view:cardCornerRadius="10dp"
                      >
                      <LinearLayout
                          android:padding="5dp"
                          android:orientation="vertical"
                          android:layout_width="fill_parent"
                          android:layout_height="fill_parent">
                          <TextView
                              android:padding="5dp"
                              android:textStyle="bold|italic"
                              android:textColor="@android:color/holo_blue_dark"
                              android:textSize="20dp"
                          android:text="@string/app_name"
                          android:id="@+id/text_name"
                          android:layout_width="wrap_content"
                          android:layout_height="wrap_content"
                          android:layout_alignParentTop="true"/>
                          <ImageView
                              android:src="@drawable/a1"
                              android:id="@+id/Image"
                              android:layout_width="match_parent"
                              android:layout_height="100dp"
                              android:scaleType="centerCrop"
                              />
                          <TextView
                              android:padding="5dp"
                              android:textColor="@android:color/black"
                              android:textSize="15dp"
                              android:layout_gravity="right"
                              android:gravity="right"
                              android:text="Email"
                              android:id="@+id/text_email"
                              android:layout_width="wrap_content"
                              android:layout_height="wrap_content"
                              android:layout_marginTop="10dp"
                              android:layout_below="@+id/textView"/>
                      </LinearLayout>
                  </android.support.v7.widget.CardView>

              </LinearLayout>


              5.Create Bean Class :- Its Bean class for set data and get data whenever we want to use it

              app-> java-> your package name


              package demo.androidpoint.com.androidcostomlist.modal;
              /*its a bean class*/

              public class item {
                 public String name ,email;
                  public int omg;
                  public item(String name, String email, int omg) {
                      this.name = name;
                      this.email = email;
                      this.omg = omg;
                  }
                  public String getName() {
                      return name;
                  }
                  public void setName(String name) {
                      this.name = name;
                  }
                  public String getEmail() {
                      return email;
                  }
                  public void setEmail(String email) {
                      this.email = email;
                  }
                  public int getOmg() {
                      return omg;
                  }
                  public void setOmg(int omg) {
                      this.omg = omg;
                  }

              }

              6.For more detail about cardView or RecyclerView
              http://goo.gl/5vWwyp

              Android Material Design Navigation Drawer Step by Step

              Comming Soon.....

              Android Floating Action Button (FAB) for based on Material Design


              Floating action buttons (or FAB) are: “A special case of promoted actions. They are distinguished by a circled icon floating above the UI and have special motion behaviors, related to morphing, launching, and its transferring anchor point.”
              FAB is not compulsory to add FAB to your app if you want to avoid the FAB you are free to do that as well and for your Floating Action Button (FAB) the actual drawable size should be 24dp.

              Design Support Library
              You should now be able to add the android.support.design.widget.FloatingActionButton view to the layout. The src attribute references the icon that should be used for the floating action.

              open Gradle Scripts-> build.gradle

              dependencies {
              'compile 'com.android.support:design:23.0.1'
              }

                                                                       Source Code   


              FloatingActionButton  
              Exp:-
              <android.support.design.widget.FloatingActionButton
                      android:layout_alignParentBottom="true"
                      android:id="@+id/fab"
                      android:layout_width="wrap_content"
                      android:layout_height="wrap_content"
                      android:layout_gravity="bottom|right"
                      android:layout_marginBottom="30dp"
                      android:layout_marginLeft="20dp"
                      android:src="@android:drawable/ic_dialog_info" />

              Screen Shot Example :-


              Color palette For Android material Design
              http://goo.gl/Vb0QcQ


              Now lets start Floating Action Button Based on Material Design Step By step 

              1.first create Material Theme.
              res-> styles.xml
              <style name="flotingMaterialTheme" parent="MyMaterialTheme.Base">
              </style>
              <style name="MyMaterialTheme.Base" parent="Theme.AppCompat.Light.DarkActionBar">
                  <item name="windowNoTitle">true</item>
                  <item name="windowActionBar">false</item>
                  <item name="colorPrimary">@color/colorPrimary</item>
                  <item name="colorPrimaryDark">@color/colorPrimaryDark</item>
                  <item name="colorAccent">@color/colorAccent</item>
              </style>


              2.Add Color For material design.  res-> colors.xml

              <color name="colorPrimary">#00BCD4</color>
              <color name="colorPrimaryDark">#00838F</color>
              <color name="textColorPrimary">#FFFFFF</color>
              <color name="windowBackground">#FFFFFF</color>
              <color name="navigationBarColor">#000000</color>


              3.Add Material Theme in Your Manifests.xml 
              <?xml version="1.0" encoding="utf-8"?>
              <manifest xmlns:android="http://schemas.android.com/apk/res/android"
                       package="demo.androidpoint.com.floatinglabelsedittext">
                   <application
                       android:allowBackup="true"
                       android:icon="@mipmap/ic_launcher"
                       android:label="@string/app_name"
                       android:theme="@style/flotingMaterialTheme">
                       <activity
                          android:name=".MainActivity"
                          android:label="@string/app_name" >
                         <intent-filter>
                             <action
                                android:name="android.intent.action.MAIN"/>
                             <category
                                android:name="android.intent.category.LAUNCHER" />
                         </intent-filter>
                      </activity>
                 </application>
              </manifest>

              4.Create toolbar layout.
              create toolbar xml seperate file for all screen layout.
              res->layout->toolbar.xml
              Ex.
              <?xml version="1.0" encoding="utf-8"?>
              <android.support.v7.widget.Toolbar xmlns:android="http://schemas.android.com/apk/res/android"
                  xmlns:local="http://schemas.android.com/apk/res-auto"
                  android:id="@+id/toolbar"
                  android:layout_width="match_parent"
                  android:layout_height="wrap_content"
                  android:minHeight="?attr/actionBarSize"
                  android:background="?attr/colorPrimary"
                  local:theme="@style/ThemeOverlay.AppCompat.Dark.ActionBar"
                  local:popupTheme="@style/ThemeOverlay.AppCompat.Light" />


              5.Add Toolbar in Your layout.
              add toolbar on your layout whenever you want by the user of include tage.
              Ex.
              <include
              android:id="@+id/toolbar"layout="@layout/toolbar" />

              6. Add Floating action buttons On Your Xml Layout.
              res->layout=>activity_main.xml
              <android.support.design.widget.FloatingActionButton
                      android:layout_alignParentBottom="true"
                      android:id="@+id/fab"
                      android:layout_width="wrap_content"
                      android:layout_height="wrap_content"
                      android:layout_gravity="bottom|right"
                      android:layout_marginBottom="30dp"
                      android:layout_marginLeft="20dp"
                      android:src="@android:drawable/ic_dialog_info" />

              7. Add Floating action buttons On Your Xml Layout.
              java->Your Package_>MainActivity.java
              insert this code inside onCrete method

              FloatingActionButton fab = (FloatingActionButton) findViewById(R.id.fab);
              fab.setOnClickListener(new View.OnClickListener() {
                @Override
                 public void onClick(View view) {
                  Snackbar.make(view, "Replace your meassge here...", Snackbar.LENGTH_LONG).setAction("Action", null).show();
                   }
                });


              8. Output after click on Floating action buttons
                 after click on Floating button open Snackbars will be open


              9. For more information
              http://goo.gl/aQmE0L

              and other material design example
              goo.gl/JlnYFY
              http://goo.gl/0XPYWJ

              Android Material Design Floating Labels for EditText Step by Step

              May 29, 2015 this functionality is now provided in the Android Design Support Library

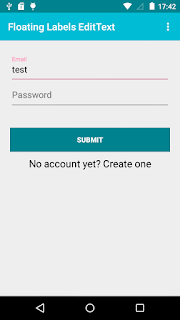
              EditText will hide the hint text after the first character is typed.you can now wrap it in a TextInputLayout, causing the hint text to become a floating label above the EditText, ensuring that users never lose context in what they are entering.
              You can also set an error message to EditText by using setErrorEnabled() and setError() methods.

                                                                            Source Code   
                                                                           

              Your screen look like this :-


              Note:
              Android floating label EditText is shown through the new design support library, first lets include it in the gradle file of our project:

              open Gradle Scripts-> build.gradle
              compile 'com.android.support:design:23.0.1'

              For Eclipse, you can find the Design Support Library project under sdk/extras/android/support/design.

              This library includes support for
              Floating labels
              Floating action button
              Snackbar
              Navigation drawer
              and more

              TextInputLayout is use for floating label on EditText
              Ex:-

              <android.support.design.widget.TextInputLayout
                 android:id="@+id/input_layout_password"
                 android:layout_width="match_parent"
                 android:layout_height="wrap_content">
               <EditText
                    android:id="@+id/input_password"
                    android:layout_width="match_parent"
                    android:layout_height="wrap_content"
                    android:inputType="textPassword"
                    android:hint="@string/hint_pass" />
              </android.support.design.widget.TextInputLayout>

              Now we learn about android material design floating labels foredittext Step by step

              1.Create MaterialTheme. res-> styles.xml

              <style name="flotingMaterialTheme" parent="MyMaterialTheme.Base">
              </style>
              <style name="MyMaterialTheme.Base" parent="Theme.AppCompat.Light.DarkActionBar">
                  <item name="windowNoTitle">true</item>
                  <item name="windowActionBar">false</item>
                  <item name="colorPrimary">@color/colorPrimary</item>
                  <item name="colorPrimaryDark">@color/colorPrimaryDark</item>
                  <item name="colorAccent">@color/colorAccent</item>
              </style>


              2.Add Color For material design.  res-> colors.xml
              
              
              <color name="colorPrimary">#00BCD4</color>
              <color name="colorPrimaryDark">#00838F</color>
              <color name="textColorPrimary">#FFFFFF</color>
              <color name="windowBackground">#FFFFFF</color>
              <color name="navigationBarColor">#000000</color>
              
              
              3.Add Material Theme in Your Manifests.xml. 
              <?xml version="1.0" encoding="utf-8"?>
              <manifest xmlns:android="http://schemas.android.com/apk/res/android"
                       package="demo.androidpoint.com.floatinglabelsedittext">
                   <application
                       android:allowBackup="true"
                       android:icon="@mipmap/ic_launcher"
                       android:label="@string/app_name"
                       android:theme="@style/flotingMaterialTheme">
                       <activity
                          android:name=".MainActivity"
                          android:label="@string/app_name" > 
                         <intent-filter>
                             <action
                                android:name="android.intent.action.MAIN"/> 
                             <category
                                android:name="android.intent.category.LAUNCHER" />
                         </intent-filter>
                      </activity> 
                 </application> 
              </manifest>
              
              4.Create toolbar xml for header. res->layout->toolbar.xml
              <?xml version="1.0" encoding="utf-8"?>
              <android.support.v7.widget.Toolbar 
                  xmlns:android="http://schemas.android.com/apk/res/android"
                  xmlns:local="http://schemas.android.com/apk/res-auto"
                  android:id="@+id/toolbar"
                  android:layout_width="match_parent"
                  android:layout_height="wrap_content"
                  android:minHeight="?attr/actionBarSize"
                  android:background="?attr/colorPrimary"
                  local:theme="@style/ThemeOverlay.AppCompat.Dark.ActionBar"
                  local:popupTheme="@style/ThemeOverlay.AppCompat.Light"/>
              
              5.Create  layout xml For floating label EditText.
              res->layout->main_layout.xml
              
              <RelativeLayou txmlns:android="http://schemas.android.com/apk/res/android"
                xmlns:tools="http://schemas.android.com/tools"
                  android:layout_width="match_parent"
                  android:layout_height="match_parent"
                  android:paddingBottom="@dimen/activity_vertical_margin"
                  tools:context=".MainActivity">
                  <LinearLayout
                      android:layout_width="match_parent"
                      android:layout_height="match_parent"
                      android:orientation="vertical">
                      <LinearLayout
                          android:id="@+id/container_toolbar"
                          android:layout_width="match_parent"
                          android:layout_height="wrap_content"
                          android:orientation="vertical">
                          <include
                              android:id="@+id/toolbar"
                              layout="@layout/toolbar" />
                      </LinearLayout>
                  </LinearLayout>
                  <LinearLayout
                      android:visibility="visible"
                      android:layout_width="fill_parent"
                      android:layout_height="match_parent"
                      android:layout_marginTop="?attr/actionBarSize"
                      android:orientation="vertical"
                      android:paddingLeft="20dp"
                      android:paddingRight="20dp"        >
                      <android.support.design.widget.TextInputLayout
                          android:id="@+id/input_layout_email"
                          android:layout_width="match_parent"
                          android:layout_marginTop="30dp"
                          android:layout_height="wrap_content">
                          <EditText
                              android:id="@+id/input_email"
                              android:layout_width="match_parent"
                              android:layout_height="wrap_content"
                              android:inputType="textEmailAddress"
                              android:hint="@string/hint_email" />
                      </android.support.design.widget.TextInputLayout>
                      <android.support.design.widget.TextInputLayout
                          android:id="@+id/input_layout_password"
                          android:layout_width="match_parent"
                          android:layout_height="wrap_content">
                          <EditText
                              android:id="@+id/input_password"
                              android:layout_width="match_parent"
                              android:layout_height="wrap_content"
                              android:inputType="textPassword"
                              android:hint="@string/hint_pass" />
                      </android.support.design.widget.TextInputLayout>
                      <Button android:id="@+id/btn_signup"
                          android:layout_width="fill_parent"
                          android:layout_height="wrap_content"
                          android:text="@string/btn_sunmit"
                          android:background="@color/colorPrimaryDark"
                          android:layout_marginTop="40dp"
                          android:textStyle="bold"
                          android:textColor="@android:color/white"/>
                      <TextView
                          android:id="@+id/txt_newaccount"
                          android:layout_marginTop="10dp"
                          android:textSize="20dp"
                          android:textColor="@android:color/black"
                          android:gravity="center"
                          android:text="No account yet? Create one"
                          android:layout_width="match_parent"
                          android:layout_height="wrap_content" />
                  </LinearLayout>
              </RelativeLayout>
              
              
              6.Here create Activity class
              java->Your Package_>MainActivity.java
              
              
              package demo.androidpoint.com.floatinglabelsedittext;
              import android.app.Activity;
              import android.os.Bundle;
              import android.support.v7.app.AppCompatActivity;
              import android.view.Menu;
              import android.view.MenuItem;
              
              public class MainActivity extends AppCompatActivity {
                  private android.support.v7.widget.Toolbar toolbar;
                  @Override  
                  protected void onCreate(Bundle savedInstanceState) {
                      super.onCreate(savedInstanceState);
                      setContentView(R.layout.activity_main);
                      toolbar = (android.support.v7.widget.Toolbar) findViewById(R.id.toolbar);
                      setSupportActionBar(toolbar);
                      getSupportActionBar().setDisplayShowHomeEnabled(true);
                      getSupportActionBar().setTitle("Floating Labels EditText");
                  }
              
                  @Override 
                  public boolean onCreateOptionsMenu(Menu menu) {
                      getMenuInflater().inflate(R.menu.menu_main, menu);
                      return true;
                  }
                  @Override
                  public boolean onOptionsItemSelected(MenuItem item) {
                      int id = item.getItemId();
                   if (id == R.id.action_settings) {
                          return true;
                      }
                      return super.onOptionsItemSelected(item);
                  }
              }
              
              
              7.For more information about material design
                   http://goo.gl/L8tSiz
                   http://goo.gl/Czwy2Y    


                      Source Code